How to Change Windshield Wiper Blades
Change windshield wiper blades in about fifteen minutes in the driveway. Move wipers to service position, lift arms safely, swap both blades with the right adapter, then test the wipe. Read one step at a time. Start with the preflight. New blade will not lock on? See Wrong adapter. Old blade frozen on? See Stuck arm.
Tips for reading this guide
- One step at a time. Read the green caption, the Why line, then the bullets.
- Move on when the green done line is true — then go to the next step.
- Protect the glass. Never let a wiper arm snap onto bare windshield — hold it or use a towel.
- Two sizes. Driver and passenger blades are often different lengths — check before you buy.
- Blade won't fit? See Wrong adapter. Tab stuck? See Stuck arm.
- Need help? Ask someone to hold the wiper arm while you press the release tab.
Things You'll Need
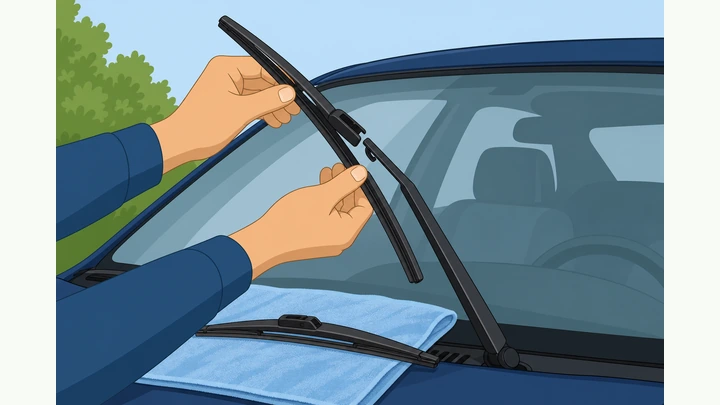
- Replacement wiper blades in correct driver and passenger lengths (check manual or old blade stamp)
- Soft towel or cardboard to protect windshield when the arm is raised
- Small flat screwdriver for stiff plastic release tabs (optional)
- Windshield washer fluid to test the wipe pattern
- Gloves optional; parking brake set and ignition off before you touch the arms
- About 15 quiet minutes; note sizes on your phone for the next purchase
Where are you stuck?
Follow Start here for a full blade swap. Jump to a branch if the adapter does not fit or the old blade will not release.
Start hereService position → lift arm → release old → match adapter → snap new → lower → test wipe → record sizes
Preflight — correct blade sizes, new blades, and ignition off.
Blade sizes · new blades · towel · ignition OFF · parking brake.
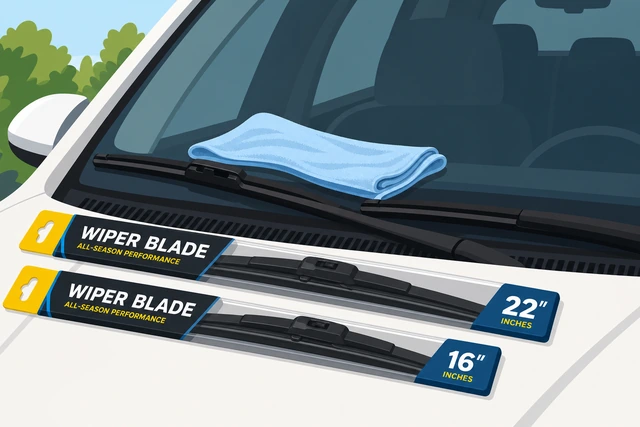
Wrong-length blades miss glass or hit the body — confirming sizes before opening packaging saves a second trip to the store.
- Sizes confirmed? Check driver and passenger lengths on the old blade stamp, manual, or parts counter screen.
- New blades ready? Packaging unopened until you verify connector type against the old blade.
- Car safe? Parking brake set, ignition off, wipers switched off.
- Glass protected? Towel or cardboard ready so arms never snap onto bare glass.
Correct lengths are confirmed, new blades are on hand, ignition is off, and glass protection is ready.
Unsure of connector type? → Wrong adapter. Never let a wiper arm snap onto bare glass — the spring can chip or crack the windshield. Hold the arm or rest it on a towel on the glass.
Park wipers in service position with ignition off.
Ignition OFF · wipers mid-glass · arms reachable.
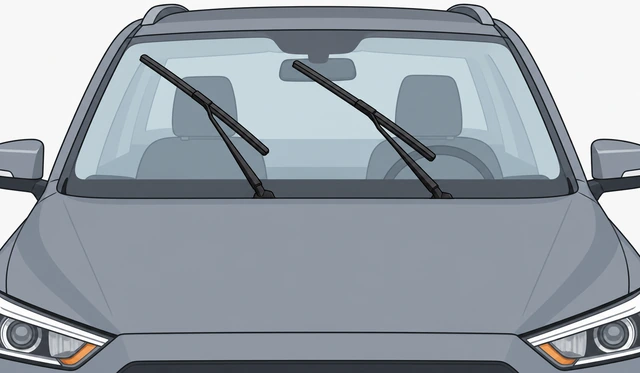
Blades hidden under the hood line cannot lift — service position puts the hook where you can reach it standing still.
- Turn ignition off and switch wipers to the off position.
- If blades sit under the hood, turn key to ON (not start) and stop wipers mid-sweep, then key off.
- Confirm both blades sit mid-windshield where arms can lift freely.
Both wiper blades sit in a reachable mid-windshield position.
Lift wiper arm away from glass — do not let it snap back.
Lift arm · hold or towel on glass · spring controlled.
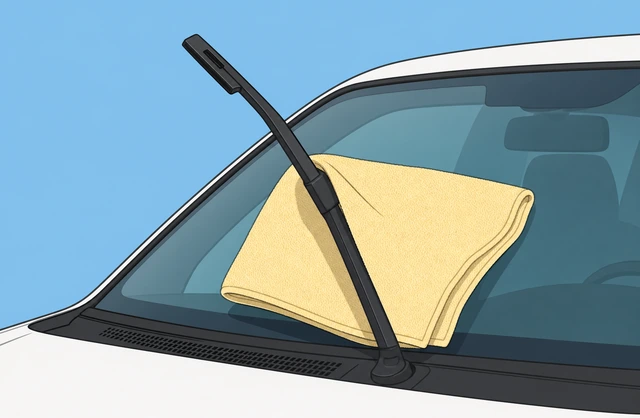
The arm spring hits glass hard enough to chip windshields — controlled lift is the highest-risk moment in this job.
- Grip the wiper arm near the hinge and lift until it locks upright or stays in your hand.
- If no lock, rest the arm on a folded towel on the glass.
- Never let the metal arm slam onto bare windshield.
Arm is raised and secured — held, locked upright, or resting on a towel.
Arm will not lift? → Stuck arm.
Identify connector type on the old blade (hook, pin, or push-tab).
Name latch style · J-hook · side pin · bayonet tab.
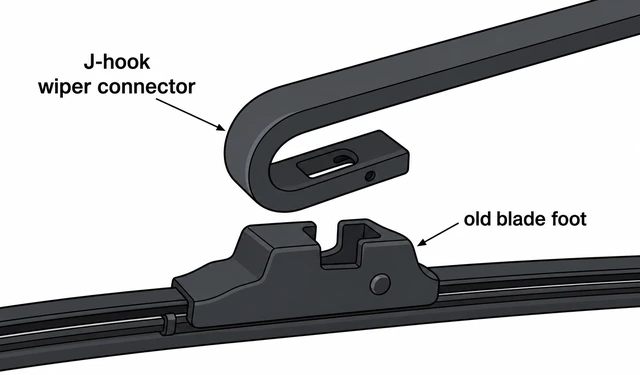
Packaging adapters only help if you know the arm style — hook and pin look similar from above but swap differently.
- Look at where the blade meets the metal arm — note J-hook, side pin, or push-tab bayonet.
- Compare to the picture on the new blade package.
- Set the old blade aside as a reference until the new one clicks on.
You can name the connector type and matched it to the package diagram.
Press release tab and slide old blade down off the arm.
Press tab · slide blade down · free hook or pin.
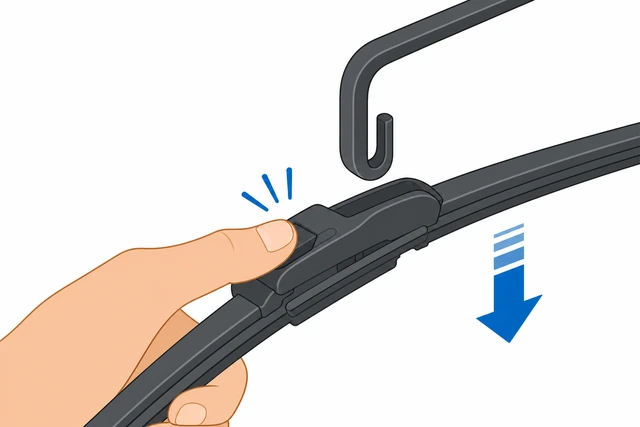
Tabs face different directions by brand — pressing while sliding down frees the blade without bending the metal arm.
- Press the plastic release tab or squeeze the latch while pulling the blade toward the windshield.
- Slide the blade downward off the J-hook or pull pin free per your connector type.
- Set the old blade on a rag — rubber side up.
Old blade is off; metal arm hook or pin is fully exposed.
Tab will not move? → Stuck arm.
Match new blade adapter to arm connector before touching glass.
Compare feet · pick adapter insert · dry fit on arm.
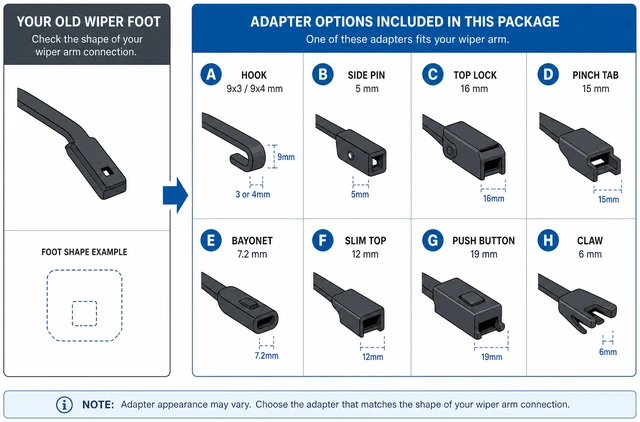
Snapping the wrong insert on looks almost right until you drive — a dry fit on the arm prevents blades flying off at speed.
- Open packaging and compare the new blade foot to the old blade and chart on the box.
- Snap the correct adapter insert into the new blade bridge if the kit includes extras.
- Hold the new blade to the arm and confirm the hook or pin lines up before lowering.
Correct adapter is selected and the new blade dry-fits the arm connector.
No adapter fits? → Wrong adapter.
Slide or snap new blade onto arm until it clicks or seats flush.
Slide up onto hook · listen for click · no gap at foot.
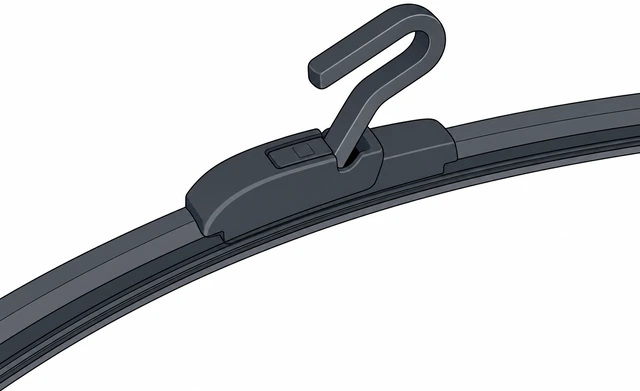
A half-seated blade can fly off on the highway — the click or flush seat is the safety check before the arm touches glass.
- Slide the new blade upward onto the J-hook or push pin into the hole until seated.
- Listen for a click or feel the latch snap; tug lightly — it should not slide off.
- Confirm the rubber runs parallel to the arm with no twisted edge.
New blade is locked on the arm and survives a light tug without sliding off.
Lower arm gently to glass; repeat on the second wiper.
Lower slowly · rubber first · repeat other side.
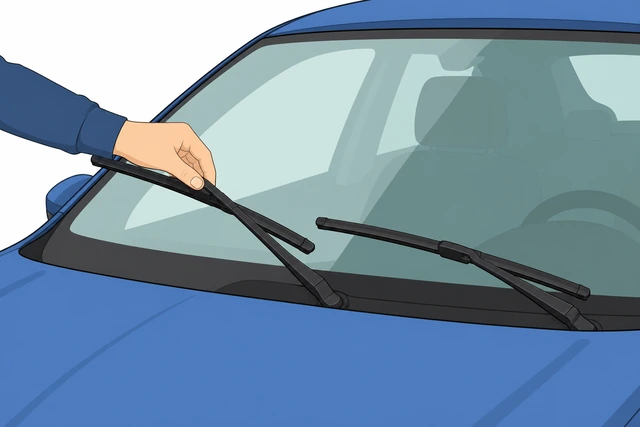
Replacing only one blade leaves streaks and chatter — both sides need fresh rubber for an even wipe.
- Guide the arm down until rubber touches glass — do not drop it.
- Repeat lift, release, adapter check, and install on the second wiper.
- Both arms rest flat on glass with rubber touching along the full length.
Both new blades are installed and both arms rest flat on the windshield.
Spray washer fluid and run wipers through one full cycle.
Mist glass · one full wipe cycle · watch tracking.
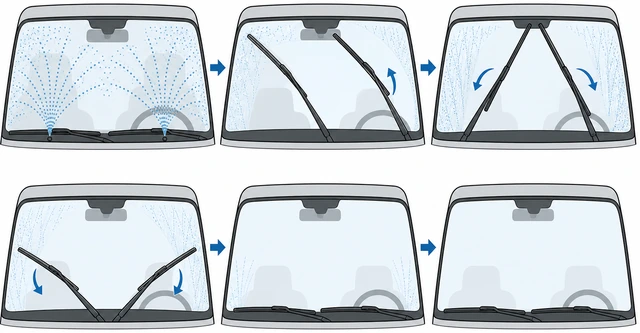
Dry glass hides skipped spots — fluid shows whether the blade edge contacts the full arc.
- Spray windshield washer fluid across the glass.
- Run wipers through one complete cycle at normal speed.
- Watch for hopping, scraping, or blades lifting off at the edges.
One full wet cycle completes without hopping or scraping sounds.
Inspect wipe pattern — center, edges, and return stroke.
Check center band · edges · return stroke · no streaks.
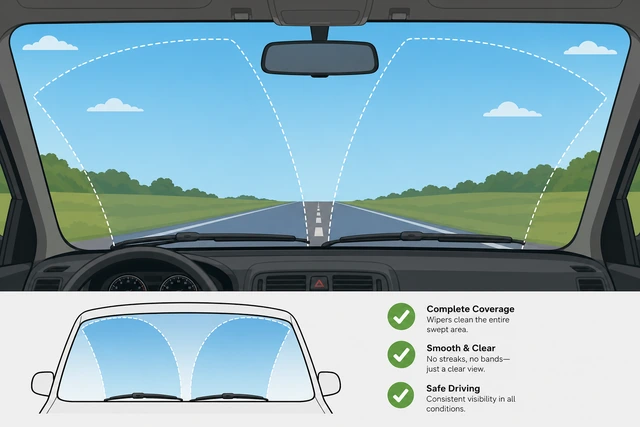
Streaks on the return stroke mean the blade is twisted or the wrong length — easier to fix now than in rain on the road.
- Look for unwiped bands in the center or along the top edge after the cycle.
- Check the return stroke — streaks there often mean a twisted adapter.
- If streaks remain, wipe rubber with a damp cloth and rerun once.
Windshield looks clear after the wet cycle with no major streaks or bands.
Wipe rubber with damp cloth; confirm blade sits parallel to glass.
Damp cloth on rubber · edge flat · no fold-over.
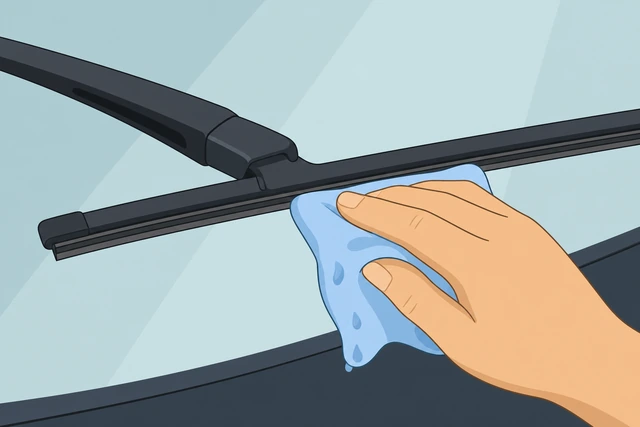
Manufacturing powder or hand oil on new rubber causes first-streak ghosts — a quick wipe settles the edge.
- Wipe each rubber edge with a damp cloth — no solvents needed.
- Confirm the blade frame runs parallel to the glass with no bowed gap.
- Rerun one washer cycle if you wiped after the first test.
Rubber is clean and the blade lies parallel to the glass along its length.
Record blade sizes; dispose old blades in trash.
Note driver/passenger inches · trash old rubber · keep receipt.
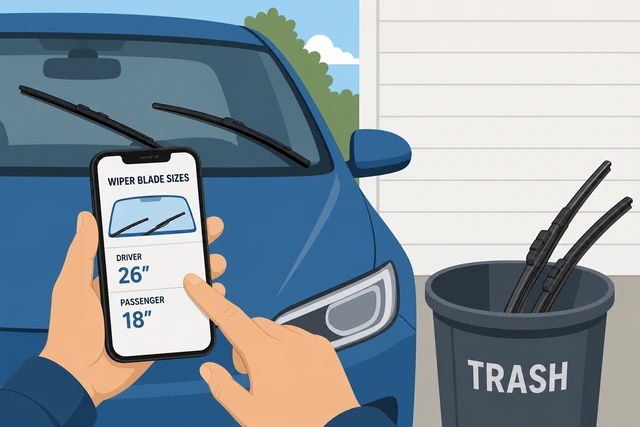
Lengths differ on most cars — writing sizes down prevents buying the wrong pack next season.
- Write driver and passenger lengths on your phone or a glove-box note.
- Toss old blades in household trash — rubber and metal frame together.
- Keep the receipt until you confirm the wipe is good for a week.
Sizes are recorded, old blades are discarded, and receipt is stored if needed.
Set reminder to replace again in six to twelve months.
Calendar reminder · after winter · replace if streaking returns.
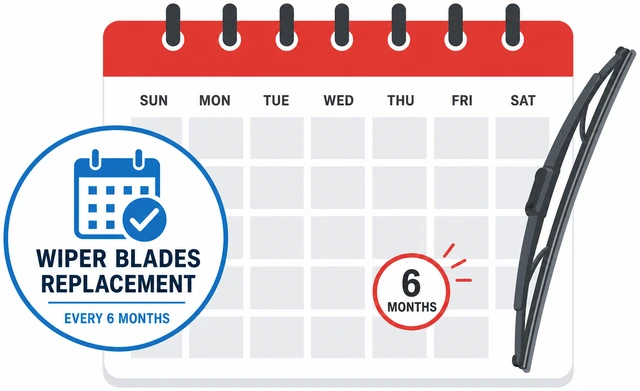
Rubber hardens with UV and ice — a calendar reminder beats waiting until rain streaks block your view.
- Set a phone or calendar reminder for six to twelve months out.
- Plan sooner replacement if you park in sun or use wipers on icy glass often.
- Replace immediately if chatter or streaks return within weeks — may mean wrong adapter.
You have a replacement reminder scheduled and know when to swap adapters or blades early.
Streaks within days? → Wrong adapter.
Wrong adapterNew blade will not slide onto the hook or pin hole does not line up
Compare old blade foot to adapter chart; try each included insert.
Chart on box · each adapter · dry fit before lowering arm.
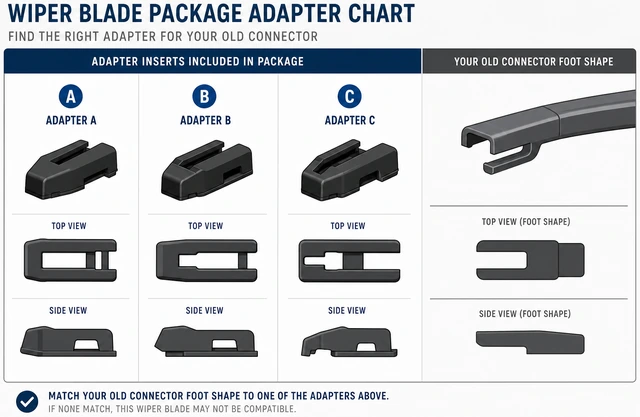
Most retail blades ship with three to four inserts — one usually matches even when the default does not.
- Lay the old blade next to the adapter diagram on the package.
- Snap each included insert into the new bridge and dry-fit on the arm.
- Mark which insert clicks with no wiggle before installing fully.
You tested each adapter insert and identified which one seats on the arm.
None of the inserts fit? Return blades with vehicle year, make, and model — arm may be bent.
Install correct adapter; tug test before lowering arm to glass.
Snap adapter · tug test · lower only after click.
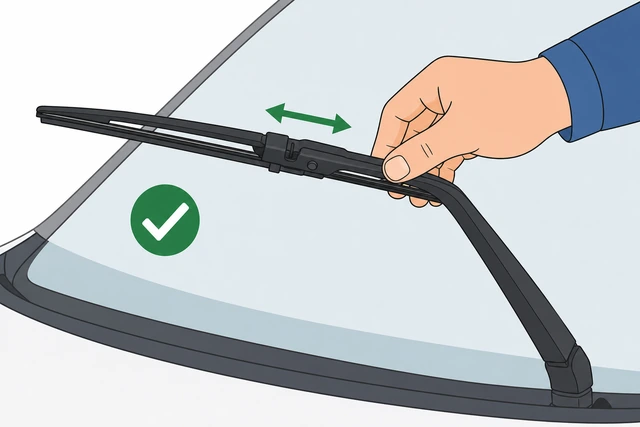
A loose fit at arm height becomes a flying blade at 60 mph — tug test is mandatory before glass contact.
- Snap the chosen adapter fully into the new blade until sides click.
- Slide onto the arm and tug firmly — it should not slide off.
- Only then lower the arm; repeat adapter pick on the second wiper if needed.
Blade with correct adapter passes tug test and is ready for wipe testing.
Arm hook looks bent or missing? Visit parts counter for arm assembly — adapter alone will not fix it.
Stuck armRelease tab will not depress or wiper arm will not lift off the glass
Protect glass; free ice or grit with soapy water or silicone spray.
Cardboard under arm · soapy water · lift with two hands.
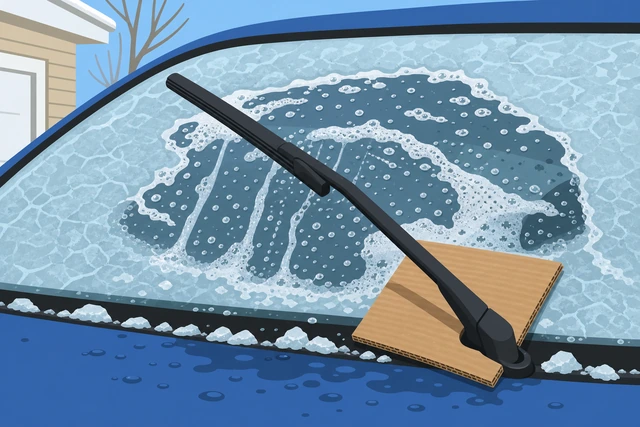
Forcing a frozen arm bends the spring or cracks glass — softening ice and grit first protects both.
- Slide cardboard under the arm if ice or grit bonds it to glass.
- Spray hinge area with soapy water or silicone spray; wait one minute.
- Lift slowly with two hands near the hinge — never pry with screwdrivers on glass.
Arm lifts off glass or tab moves after softening — or you stopped because plastic cracked.
Never let a wiper arm snap onto bare glass — the spring can chip or crack the windshield. Hold the arm or rest it on a towel on the glass.
Press tab with flat screwdriver while wiggling blade downward.
Flat screwdriver on tab · wiggle blade down · towel on pliers if needed.
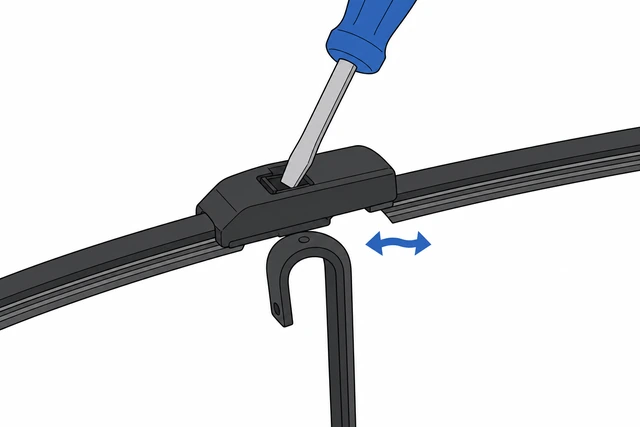
Tabs often need push-and-slide at once — a second tool on the tab frees the blade without twisting the metal arm.
- Hold the arm steady with one hand; press the tab with a flat screwdriver.
- Wiggle the blade downward off the hook while keeping pressure on the tab.
- If gripping metal, wrap pliers jaws with a towel — twist only the plastic blade foot.
Old blade releases and arm hinge feels normal when lowered slowly.
Latch plastic breaks or arm spring feels weak? Replace arm assembly at parts store — do not over-bend metal.
When to get help
- Ask someone to hold the wiper arm while you press the release tab with both hands.
- Arm hook bent or blade flies off after tug test? Visit an auto-parts counter for arm replacement.
- Windshield already chipped by a snapping arm? Stop DIY wipe tests and consult glass repair.
- Rear hatch wiper uses a different connector? Buy rear-specific blades with clerk verification.
- Streaks persist on new blades and clean glass? Ask a shop to check wiper linkage or windshield pitting.
When This Doesn't Work
- No adapter fits after trying every insert. Return blades with exact vehicle year, make, and model; arm hook may be bent or nonstandard.
- Wiper arm spring feels weak or arm will not stay on glass. Replace the arm assembly — blade swap alone will not fix it.
- Rear wiper on hatchback. Often uses a different pin connector — buy rear-specific length; same lift-and-release idea.
- Streaks only on one side after correct install. Windshield may be oily or pitted — clean glass with glass cleaner; deep pits need pro attention.
- Winter arm frozen to glass. Free ice first; never pull arm without softening — can tear the hinge.
Warnings
- Do not let wiper arms snap onto bare glass. Chip and crack risk — use a towel or hold the arm.
- Do not twist the metal wiper arm to force a stuck blade — bend the arm and blades will not track.
- Do not run wipers on dry glass during testing — use washer fluid.
- Do not mix one new blade with one old blade — uneven rubber causes chatter.
- Do not drive if the blade fails a tug test — it can detach at speed.
Tips
- Driver and passenger lengths often differ — always buy the pair listed for your car.
- Keep the old blade next to the car until the new one clicks — instant visual match.
- Replace both blades together even if only one streaks — rubber ages as a set.
- Lift arms before a snowy night so blades do not freeze to glass.
- Photo your adapter chart on the package for next year's purchase.
FAQ
How do I know what wiper blade size to buy?
Check the old blade rubber stamp, your owner's manual, or a parts counter lookup by year, make, and model. Driver and passenger lengths are often different.
Why won't my new blade snap onto the arm?
Usually the wrong adapter insert. Compare the old blade foot to the package chart and try each included adapter before lowering the arm.
Can I replace just one wiper blade?
You can, but mixing old and new rubber often causes streaks and chatter. Replacing both at once gives an even wipe.
How often should I change wiper blades?
Every six to twelve months, or sooner if you see streaks, skipping, or chatter after cleaning the rubber.
What if the release tab is stuck?
Soften ice or grit with soapy water, protect the glass, press the tab with a flat screwdriver while wiggling the blade downward. See the stuck-arm branch.
Comments
Questions, corrections, and what worked for you. Comments are reviewed before they appear.